(From Settings>Transmitters.)
Note: you will only see all the options under the Settings menu if you are an Administrator user.
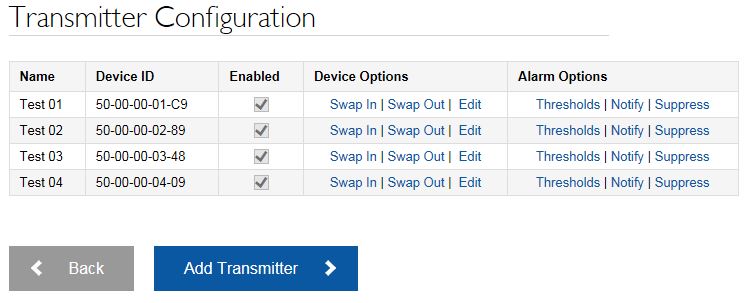
•The Transmitter Configuration facility enables you to do various things to the Transmitter-Sensors which you have already defined as being part of your Notion Lite System.
You can:
(You might want to do this if a Transmitter-Sensor becomes defective and you replace it with a new one, but you want to keep the name of the old Transmitter-Sensor.)
1.Click on Swap In for the Transmitter-Sensor you want to swap. 2.In the Swap Physical Device page, enter the ID number of the Transmitter-Sensor you are 'swapping in' in the New Product ID box. 3.Click the 'Swap' button.
|
(You could do this if you want to move the Transmitter-Sensor to a different storage unit, but still be able to see the data that the Transmitter-Sensor had recorded when it was in the other storage unit.)
1.Click Swap Out. 2.Click the 'Swap Out' button (The Product ID number disappears from the Transmitter Configuration table. The ID number can be swapped back in again using Swap In. Use Swap In and Swap Out to swap two Transmitter-Sensors with each other.) |
1.Click Edit. •To change the Transmitter-Sensor name enter the new name in the Sensor Name box. •To change the maximum and minimum temperature values on the temperature axis of the Graphical Data page, enter the required values into the appropriate Temperature Axis box. (Temperature Units can be set from the Edit Account Details page.) •To change the calibration offset, enter the new offset value in the Calibration Offset box. •To disable the Transmitter-Sensor, clear the Enabled tick box. (The Enabled tick box will become clear in the Transmitter Configuration table.) 2.Click the 'Save Changes' button. To enable a disabled Transmitter-Sensor, Edit the Transmitter-Sensor and select the Enabled tick box before clicking 'Save Changes'. |
For each Transmitter-Sensor, you can set threshold values ('General', 'Temperature' and 'Time Open' types), outside of which an alarm will be given. You cannot create thresholds to begin with. Notion Lite does that for you. See Thresholds for more detail.
Click Thresholds under the Alarm Options column for the relevant Transmitter-Sensor. •To change a threshold value: i.Click Edit against the Threshold Type you wish to change. ii.In the resulting Edit Threshold page, enter the new threshold value. iii.Make sure the Enabled box is ticked unless you wish to disable the threshold. Click 'Save Changes'. |
If you have a Transmitter-Sensor with a Door Switch channel, you can set the Door Open time beyond which an Alarm will be given.
Click Thresholds under the Alarm Options column for the relevant Transmitter-Sensor. •To change a threshold value: i.Click Edit in the Channel 2 : panel. ii.Change the value in the Threshold (min(s)) box in the Edit Threshold page. An alarm will be given if the door remains open for this period or longer. iii.Make sure the Enabled box is ticked unless you wish to disable the threshold. Click 'Save Changes'. |
This facility allows you to set up contact details for users so they can be alerted when alarm thresholds are exceeded.
•To add a new alarm recipient: |
i.Click Notify for the relevant Transmitter-Sensor to give the Manage Alarm Recipients page. |
ii.Click 'Add Recipient'. |
iii.Select the required user from the User ID list. |
iv.If you want the user to receive emails about alarms select the E-Mail Recipient tick box. In order for users to be able to receive SMS messages to their mobile phones to tell them that a Transmitter-Sensor has gone into Alarm, you must purchase SMS credits. See Modify your Company's Account. |
v.If you want the user to receive SMS text messages about alarms select the SMS Recipient tick box. |
vi.Click the 'Create' button. |
•To edit an alarm recipient: |
i.Click Notify to give the Manage Alarm Recipients page. |
ii.Click Edit. |
iii.On the Edit Alarm Recipient page, clear the Recipient tick boxes as required. |
iv.Click 'Save Changes'. |
•To delete an alarm recipient: |
i.Click Notify to give the Manage Alarm Recipients page. |
ii.Click Delete. |
iii.Click the 'Delete' button on the Delete Recipient page. |
Note: This operation deletes the user as an Alarm message recipient. It does not delete the user. |
This facility enables you to specify times when alarms will not be given.
•To set suppression times |
i.Click Suppress for the relevant Transmitter-Sensor to give the Suppress page. |
ii.Select the tick boxes for the days when users will not receive alarm messages. |
iii.If you wish to specify times of day (within days when alarm messages have not been suppressed) when alarm messages will not be sent, select the Apply Suppression Time tick box, then enter the required clock times (in HH:MM format) in the Suppress From and Suppress To text boxes. Note: It is possible to set a To Time to be 'earlier' than a From Time - for example, setting a From Time of 18:00 (say) and a To Time of 08:00 would mean "suppress alarm messages between 18:00 on day 1 and 08:00 on day 2". |
iv.Click 'Save Changes'. |